Stopping a Robot if It Tips Over
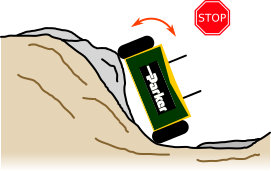
In this example, we'll show how the 3DM-CV7 event system can be used to trigger a robot's emergency stop feature in the event that it rolls over.
 Warning: The 3DM-CV7 is not a safety-rated device. Do not use it as a safety device in applications where failure of such device could lead to personal injury, death, or significant property damage. The application in this example is for additional protection only, to improve the safety or convenience of an already-safe system.
NOTE: This example can be easily adapted to the 3DM-CV7 by substituting GPIO 1 or GPIO 2 for GPIO 4.
Hardware Setup
Let's assume the robot has a built-in emergency stop system which is triggered by a dedicated digital E-stop control signal. As a demonstration, we'll connect a buzzer to GPIO 4 to let us know if the E-stop has been triggered.
Important: Avoid connecting the 3DM-CV7 to an E-stop control line shared with other safety-critical E-stop signaling devices. Device failure or misconfiguration might prevent proper operation of the E-stop system (e.g. it may lock an shared active-low signal to the high state if configured improperly).
Device Configuration
GPIO
We'll set up GPIO 4 as a push-pull output to serve as our E-stop signal.
Command: GPIO Configuration (0x0C,0x41)
- Function: WRITE (0x01)
- Pin: 4
- Feature: GPIO (0x01)
- Behavior: GPIO_OUTPUT_LOW (0x02)
- Mode: None (0x00)
Command bytes: 0104010200
MIP Packet: 75650c07 07410104010200 3d70
Verify GPIO (Optional)
To verify the configuration and hardware connection, we can use the GPIO State command to manually set the pin to the high state (buzzer will sound) and the low state (buzzer quiet).
Command: GPIO State (0x0C,0x42)
- Function: WRITE (0x01)
- Pin: 4
- State: high (0x01)
Command bytes: 010401
MIP Packet: 75650c05 0542010401 38e4
Command: GPIO State (0x0C,0x42)
- Function: WRITE (0x01)
- Pin: 4
- State: low (0x00)
Command bytes: 010400
MIP Packet: 75650c05 0542010400 37e3
GPIO Action
Since we want to control a GPIO pin, we'll need a GPIO action. We'll use the oneshot mode so the pin will only be set to the stop state. We'll let a human operator manually reset the E-stop system (more on this to follow).
Command: Event Action Configuration (0x0C,0x2F)
- Function: WRITE (0x01)
- Instance: 1
- Trigger ID: 1 (must match trigger config below)
- Type: GPIO (0x01)
- Parameters:
- Pin: 4
- Mode: ONESHOT_HIGH (0x05)
Command bytes: 010101010405
MIP Packet: 75650c08 082f010101010405 323b
Threshold Trigger
Let's assume the robot is stable until it rolls 45 degrees to the left or right. The Complementary Filter Euler Angles (0x80,0x0C) contains the roll angle in radians from the Complementary Filter. We'll use this data field and set a Trigger: Threshold at +/- PI/4 radians. To make the trigger active when the roll is outsidethe limits, we must reverse the high and low thresholds.
Command: Event Trigger Configuration (0x0C,0x2E)
- Function: WRITE (0x01)
- Instance: 1 (must match trigger ID in action)
- Type: Threshold (0x02)
- Parameters:
- Descriptor Set: 0x80 (Sensor Dataset)
- Field Descriptor: 0x0C (Euler Angles)
- Parameter ID: 1 (Roll)
- Mode: WINDOW (0x01)
- Low Threshold: +0.7853981 (+45 degrees)
- High Threshold: -0.7853981 (-45 degrees)
Command bytes: 010102800c01013fe921fb323ae5afbfe921fb323ae5af
MIP Command: 75650c19 192e010102800c01013fe921fb323ae5afbfe921fb323ae5af e040
Enable the Trigger
Ensure the 3DM-CV7 is lying face-up (z axis pointing down) on a level surface.
Command: Event Control (0x0C,0x2B)
- Function: WRITE (0x01)
- Instance: 1
- Mode: ENABLE (0x01)
Command bytes: 010101
MIP Command: 75650c05 052b010101 1e82
Test it
Tilt the 3DM-CV7 along the X axis (i.e. rolling) until the buzzer sounds. Since we used the oneshot mode in the GPIO action, it will not stop even if the device is returned to the upright position. To reset, send the following command which will set the pin low again:
Command: GPIO State (0x0C,0x42)
- Function: WRITE (0x01)
- Pin: 4
- State: low (0x00)
Command bytes: 010400
MIP Packet: 75650c05 0542010400 37e3
This is a "manual reset" command which could be issued by the robot during startup after an E-stop event. Note that if the pin is reset while the robot is still tipped over (rolled past 45 degrees), it will stay reset until the robot is (righted within 45 degrees) and tips over again.
Additional Features
Hysteresis
It may not be desirable to manually reset the E-stop signal with a MIP command. Instead, perhaps the robot should recover on its own, once righted. Typically the robot would have to return to the upright position within a small tolerance. The following two advanced examples describe ways to implement such hysteresis.
- Using Two GPIO Actions in Oneshot mode - Add a second and opposite pair of triggers and actions
- Using a Latching Combination Trigger for Hysteresis - Add a second threshold and latching behavior
Adding Pitch Detection
See the advanced example, Using Two Thresholds with a Combination Trigger, to learn how to set up multiple thresholds.